
One crucial step that often goes overlooked when preparing your floor for tiling is sealing with primer. In this comprehensive guide, we'll explore why this step is essential, and how it can improve the longevity and quality of your tiled surfaces.
Whether you're working with concrete, wood, or other types of flooring, we'll take you through the benefits of using primer, the types of primers available, and a step-by-step process that ensures a smooth and durable tile installation.
Is it necessary to put down primer before tiling a floor?
If you're wondering, "do I need to prime before tiling?", the answer is generally yes. However, while it’s typically recommended, there are sometimes some exceptions. We’ve explained whether you’ll need primer before tiling on each common surface.
Do I need to prime a wooden floor before tiling?
It’s recommended to use a primer when tiling on a wooden floor, to ensure the best possible surface for the adhesive to bond with. Without proper preparation and priming, you risk your tiles peeling up later due to poor conditions.
Priming becomes even more of a necessity once you consider the amount of dirt, plaster, adhesive, and various debris that can get ground into the surface. Without priming, the adhesive may just stick to the dirt instead of the floor, leading to tile failure.
However, before priming a wooden floor, it’s crucial to ensure that your floor structure can support the tiles. For example, you can’t directly tile over floorboards because they aren’t strong enough. In this case, you’ll need to do something called overboarding, which involves adding a layer of marine-grade plywood (not the inexpensive ‘sheathing’ plywood) on top of the floorboards - the thicker the better, with 12-18mm recommended for better floor stability.
Do I need to prime a concrete floor before tiling?
So, we’ve looked at wooden boards, but do you need to seal a concrete floor before tiling? Well, after the concrete has dried completely and any residual substances or dust have settled on the surface, you might think you can install tile directly on the concrete.
However, while adhesive manufacturers might say it's possible, we highly recommend priming a concrete floor for better results. Here's why: imagine if the floor still has dust or debris on it. The adhesive will sit on top of the dust, not properly bonding with the concrete. This can lead to tile peeling or delamination over time - a problem that we go into more detail on in our guide on how to tile on a concrete substrate. To avoid these problems, it's best to make sure you’re priming concrete floor before tiling begins.
Do I need to prime screed floor (anhydrite) before tiling?
If you have an anhydrite screed flooring (also known as calcium sulphate), using a primer before tiling is absolutely necessary. A self-levelling liquid screed, it’s commonly used in modern construction due to its advantages over sand and cement, but you can't simply tile directly onto it with regular adhesives. If you do, a chemical reaction will occur between the screed and the adhesive, causing them to separate over time.
You'll need to seal the floor with a high-quality acrylic primer. Applying two coats of primer in perpendicular directions is recommended; just make sure to let the first coat dry before applying the second coat. Typically, the primer is diluted with two parts water to one part primer, to allow it to penetrate the screed properly. If the primer is too thick, it will just sit on top of the screed and can cause tile delamination over time, especially if you’re tiling over underfloor heating, which is often the case with anhydrite screeds.

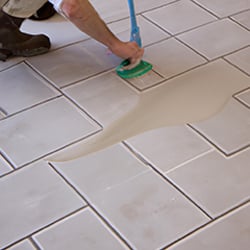
How to put down primer on your floors
Follow these simple steps to put down primer on your floor:
- Gather the necessary materials:
- High-quality primer suitable for your floor type (e.g., concrete, wood).
- Paint roller or brush for application, as well as a paint tray or container.
- Cloths or protective sheets to cover any adjacent areas.
- Prepare the floor:
- Clean your floor thoroughly, making sure to remove any dirt, dust, grease, or debris.
- Repair any cracks or imperfections on the surface, and allow them to dry completely.
- Read the instructions:
- Carefully read the manufacturer's instructions provided with the primer product.
- Follow any specific guidelines or recommended mixing ratios, if applicable.
- Protect surrounding areas:
- Assemble your protective sheets and cover any adjacent surfaces or areas that you want to keep free from primer.
- Mix the primer (if required):
- If the primer needs to be mixed, follow the instructions to achieve the recommended consistency.
- Start priming:
- Pour the primer into a paint tray or container for easy access.
- Dip your paint roller or brush into the primer, ensuring it’s evenly coated but not dripping.
- Apply the primer:
- Begin applying the primer to the floor using smooth and even strokes.
- Work in small sections, covering the entire surface area intended for tiling.
- Maintain a consistent layer thickness as recommended by the manufacturer.
- Allow drying time:
- Follow the recommended drying time provided by the primer manufacturer.
- Ensure the area is well-ventilated during the drying process.
- Apply a second coat (if required):
- Some primers may require a second coat for optimal results.
- If recommended, repeat the priming process after the first coat has dried, following the same application techniques.
- Clean up:
- Clean your tools and equipment promptly with water or the appropriate cleaning solution, as directed by the primer manufacturer.
Remember, the quality of your priming job can greatly impact the success of your tiling project. Take your time, follow these steps diligently, and allow the primer to dry thoroughly before proceeding with tile installation. And to ensure your tiles stay protected during and after installation, check whether your floor tile material requires a tile sealer to guard against dirt, dust, and stains.
What are the best priming products?
There are a number of good quality tile primers & cleaners you can use, including standard building products like SBR that are widely available in builder’s merchants. However, we recommend the use of premium brand products like the Kerakoll Primer A, which is specifically formulated for this kind of work, and any other floor priming.
What you absolutely shouldn’t use is PVA. This isn’t meant to be used as a floor primer - it’s suitable for school glue and sticking wood together, but not much else. It might give you a reasonable key for the adhesive to stick to, but it will not stick to the floor properly and your tiles will probably peel up. It’s just not worth the risk for the sake of £20 or so.
If you require any further technical advice, feel free to speak with one of our specialist team who will be happy to discuss your requirements, and check out our tile installation advice page for more DIY content and information, including our guide on re-sealing natural stone tiles.


