
Natural stone tiles are a timeless and elegant choice, but over time, they may develop cracks, chips, or other forms of damage. However, fear not! This comprehensive guide is here to empower you with the knowledge and skills needed to repair and restore your stone tiles to their natural beauty.
We’ll guide you through the best ways to replace and repair broken tiles and offer a step-by-step process for filling and smoothing minor cracks and chips, to achieve a flawless finish that blends seamlessly with the surrounding tiles. Let’s jump right into it.
Typical floor tile repairs
Three main types of damage can occur with natural stone tiles:
- Cracks arising from movement in the substrate.
- Scratches from something being dragged over the tiled surface.
- Chipping when something heavy is dropped on the tiles.
Fortunately, each of these types of damage can be addressed with basic DIY skills and a suitable floor tile repair product.
How to repair cracked floor tiles
To repair cracked floor tiles, start by examining the affected area to determine its severity. If the crack is minor, you may be able to repair it and keep your existing tile. However, if the crack is extensive or the tile is completely shattered, you’ll likely need to replace it.
If you’re replacing a cracked tile:
- Gather the necessary materials: You’ll need a few items, including a matching replacement tile (if possible), a tile adhesive for natural stone, a putty knife, a damp cloth, masking tape, and a grout matching the existing colour.
- Remove the damaged tile: Use a putty knife to gently chip away the grout surrounding the cracked tile, taking care not to damage the neighbouring tiles. Once the grout is removed, use a hammer and chisel to break the damaged tile into smaller pieces. Remove the broken tile and clean the area to ensure a smooth surface.
- Prepare the replacement tile: If you have a matching replacement tile, ensure it is clean and dry. Apply a thin layer of tile adhesive to the back of the tile using a putty knife, following the manufacturer’s instructions.
- Install the replacement tile: Carefully place the replacement tile into the space, pressing it firmly into the adhesive. Ensure it is aligned with the surrounding tiles. Wipe off any excess adhesive immediately with a damp cloth. Once the adhesive has set, you can then regrout.
If repairing a cracked floor tile:
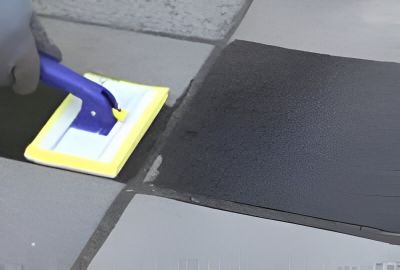
- Fill the crack: If the crack is small and does not require replacing, you can repair it by filling the crack with a filler. Mix the filler according to the manufacturer’s instructions, and carefully apply it to the crack using a putty knife. Smooth out the surface and remove any excess material.
- Allow for curing: Give the filler enough time to cure as per the manufacturer’s instructions. This typically ranges from a few hours to a day. During this time, avoid stepping on the repaired area.
- Reapply grout (if necessary): If you had to remove grout during the replacement process, once the filler has cured, you’ll need to regrout the area. Mix a matching grout colour according to the manufacturer’s instructions, and apply to the repaired area, making sure to fills the gaps. Wipe off any excess grout with a damp cloth.
Remember, the specific steps and materials may vary depending on the type of natural stone tile you are working with. We would recommend using a trusted restoration product such as Tilemaster Stone Repair Resin Filler. The stone filler is a mastic made of polyester resins, which is possible to polish to the current shine on your tiles.
How to repair a chipped floor tile
All tiles, whether natural stone or porcelain, are prone to chipping when something heavy and sharp is dropped onto them. In many cases, the dropped object will come off worse, as tiles are generally very hard-wearing, but on occasion, the tiles will chip and require repair. If this happens, you’ll need to assess the damaged area and decide whether to replace or repair your tile.
If you’re repairing a chipped tile, follow these steps:
- Gather the necessary materials: For the floor tile repair, you'll need a filler suitable for your tile type, a putty knife or a small spatula, a damp cloth, masking tape, and fine-grit sandpaper.
- Fill the chip: Apply a small amount of tile filler to the chip using a putty knife or a small spatula. Make sure to fill the chip and level it so it’s flush with the surface of the tile.
- Remove excess filler: Before the filler fully hardens, use a damp cloth to gently wipe away any excess filler from the tile surface. This will help achieve a seamless finish.
- Mask the repaired area: If the repaired tile is near other tiles, use masking tape to cover and protect it from accidental damage while it dries. Ensure the tape adheres firmly to the tile surface.
- Allow for drying and curing: Follow the manufacturer's instructions regarding the drying and curing time for the filler. Typically, it takes several hours to a day for it to fully harden and cure.
- Sand and blend the repaired area: Once the filler has cured, use fine-grit sandpaper to gently smooth the repaired area, taking care not to scratch the surrounding tiles. Sand the repaired area until it is flush with the rest of the tile surface.
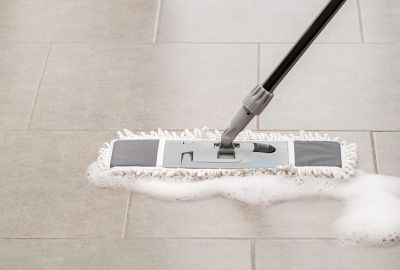
- Clean the tile: Wipe down the repaired tile and the surrounding area with a damp cloth to remove any residue or dust.
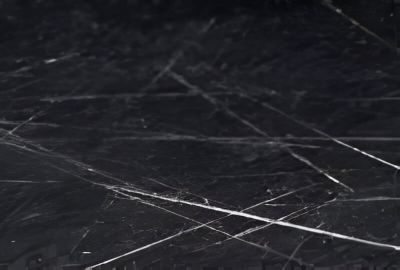
How to repair scratched tiles
Although natural stone floor tiles are typically hardwearing and durable enough to cope with everyday use, when something sharp is dragged across the tiles, the surface is prone to being scratched.
This is likely to show up more on a polished tile than on a honed matte surface. However, the good news is that scratched tiles can be repaired easily with good DIY skills. Our full guide on how to repair scratched tiles explains the complete process, and takes you through step-by-step instructions to fix your flooring.
If a surface is inherited and has been mistreated for several years, then hiring a professional restoration company such as the specialists at Tile Master may be your best solution, as they have the tools, products and know-how to restore your surface to showroom condition.
Make sure you use the right tile adhesive for your project
Whether you’re fixing limestone, marble, or travertine floor tiles, you need to use the correct adhesive to ensure your tiling project is a success. Failure to assess and prepare your substrate and adhesive may result in the floor tiles cracking, or the tile adhesive de-bonding from the substrate.
Remember, repairing natural stone tiles is a skill that requires patience and attention to detail. We encourage you to always refer to the manufacturer guidelines and seek professional advice when necessary, especially for more complex tile repairs - our knowledgeable team is here to support you every step of the way.
At Stone Superstore, we understand the value of beautiful natural stone tile flooring and the importance of keeping it in pristine condition, so check out our advice guides for more tile maintenance and care advice.