
Completing the grouting is a key part of any tiling installation process that comes with any renovation project and is often the final step you need to take before you can stand back and admire your handiwork.
However, while grout can look great when it’s first applied, over time, it can become stained, cracked, and perhaps even mouldy and it can be incredibly frustrating living with mould and mildew-ridden grout that refuses to come clean.
Fortunately, if you’re unhappy with the state of your grouting, it’s remarkably easy to remove and reapply it. In fact, with the right tools and a little effort, it’s something any of us can do at home.
So, if you want to know how to remove old grout from your natural stone tiles or porcelain tiles quickly and easily, as well as reapplying it afterwards, then read on to learn about the entire process.
Why might you need to remove grout?
Before we get into how to remove old grout, let’s first look at some of the reasons why you might want to remove and replace this key part of your tiling installation.
As we’ve already mentioned, one of the main culprits for such a decision is mould and mildew. This will most commonly affect the grouting in your bathroom due to increased moisture in the air and it can be very difficult to remove mould fully without damaging your grout to some degree.
But besides mould and mildew, other reasons that might have you wanting to swap out your grout could also be due to age and style. Aged grouting in particular will usually need replacing as it will eventually crack and chip over decades of use, and if your grout no longer matches your home décor, then it makes sense to replace it.
How to remove grout from floor tiles
To begin properly removing grout from tiles, the first thing you’re going to need to do is to collect the right set of tools for the job. If possible, you should look to pick up the following items:
- A rotary tool/grinder equipped with a continuous diamond blade.
- A small, flathead screwdriver
- A dull Stanley knife
- A stiff brush Safety glasses
- A vacuum cleaner
Once you have all of these to hand, it’s time to get started by following the steps below:
1. Taking your bladed rotary tool, align it horizontally or vertically with the grout you want to remove and gently press it against the centre of the line. This will remove the majority of your grout with little effort as you move it along the line, so keep at it until all of the grout in question has been removed. Be careful not to touch the tile edges.
2. While effective, your saw won’t be able to get all your grout in one go. So, once you’ve cleared the main body of grout away, go back over your lines while angling your saw towards the tile edges in order to get any grout still clinging to your tiles. Again, do this slowly and gently to avoid damaging your floor or wall.
3. Once you’re happy with your grinding work, take your screwdriver and steadily scrape away any remaining grout you can see, using your dull knife here and there for any particularly stubborn bits.
4. Keep at this until you can’t see any more grout then take your brush and clean out all the dust and mess the process has made. With that done, hoover up and get ready to start replacing the grout you just removed.
And that’s pretty much it. Simple, right? Just remember to be patient and take your time, the last thing you want to do is damage any tiles and have to replace these as well.
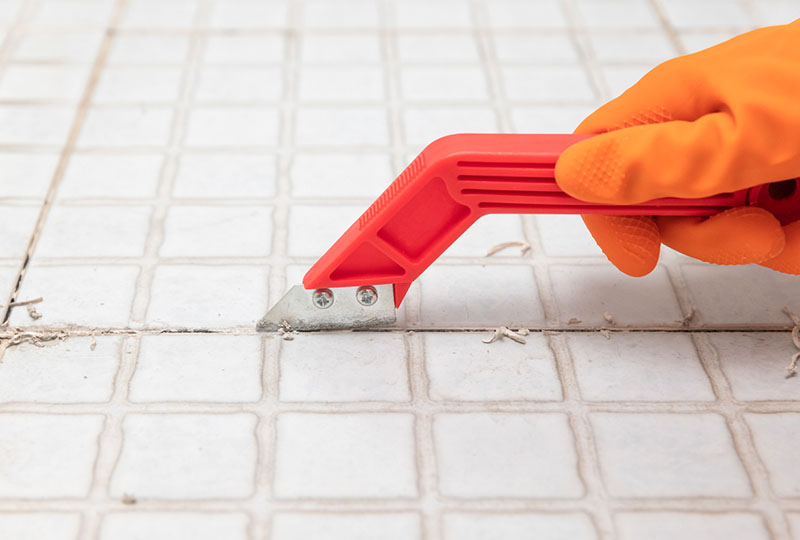
How to remove grout without power tools
Although the method we’ve outlined above is the most effective way to start removing grout from floor & wall tiles, if you’re unable to get your hands on a rotary power tool, it is still possible to learn how to remove grout by hand.
First, you’ll want to supplement your power tool with a grout rake or small hammer and chisel. With a grout rake, you can swiftly pry the grout from its holdings, but if you only have access to a hammer and chisel, then you’ll need to methodically use them to chip away at your grouting until you’ve removed the majority of it.
After this, follow up with your screwdriver and knife as before to clear away the grout that’s left and brush the area clean, ready for regrouting.
How to remove excess grout from tiles
Excess grout coating your tiles typically tends to be a problem straight after tile installation and it should ideally be removed as soon as possible to prevent the formation of grout haze after your tiles have been sealed.
If still wet, then you can simply wipe any excess grout away using a damp sponge. However, if it has had a chance to dry, then you’ll need to get hold of a plastic scraper and use short strokes to clear it away, periodically wiping the area you’re working on with a wet sponge to clean streaks and smudges.
How to go about replacing grout
So, now that you’ve removed all of the grout that looked out of place or was falling apart, what about replacing it with some fresh grout so that your tiles look complete and are protected from rubbing against one another?
Well, much like removing grout from tiles, the process of replacing grout is relatively easy and can be done without the assistance of an expert:
1. Take your chosen grouting product and follow the instructions provided to create the grouting mixture you’ll be spreading.
2. Once you’re happy with the mixture, apply it to your tiles using a grout spreader in a diagonal motion, using the edge of the scraper to clear away excess grout as you go.
3. Keep at this until the whole area has been grouted and then wipe off any remaining excess grout with a wet sponge. Wait a further few minutes for it to dry and then wipe it again to ensure everything is clean.
And that’s it! With these tips in hand, you should have no problem removing and replacing any grout around your home. However, if you find that excess grouting was not removed from your tiles after installation and has evolved into stubborn grout haze, then we suggest reading our blog on how to remove grout haze to deal with this problem.
Don’t forget that you can get in touch with the experts at Stone Store today for more advice on your tiling needs and we have plenty of other articles in our advice blog covering all manner of tiling in the home.


