
Whether you’re planning on laying down a beautiful new set of natural stone tiles in your kitchen, or a porcelain tile set to match your bathroom sink and shower, it’s very important that you properly prepare the surface before you start.
But there’s more to preparing a floor for tiles than simply cleaning it before you get to work. You need to be sure the floor in question is suitable for tiling and whether or not repairs might be needed before you start.
So, to help you lay your new tiles without issue, here’s everything you need to know about how to prepare a floor for tiling.
Things to consider when preparing a floor for tiles
As we’ve already mentioned, before you even think about fixing your new tiles, you first need to assess whether or not the floor is suitable to tile onto. For example, if your floor is uneven, you’ll need to level your substrate so your tiles lie flat.
Fortunately, unless your floor is in a very poor condition, you won’t need to carry out much in the way of repairs. Though, you’ll still want to assess your floor on the following areas before laying your tiles down:
- How even is your floor and does it require a new screed?
- Does your floor need any repairs?
- Do you need to remove a previous tile set before you get started?
- Is the floor properly cleaned and free from contaminants?
- Is the floor strong enough to properly support your desired tiles?
By ticking off all of these points, you can be confident that your floor is ready to be tiled onto without issues and avoid any of your new tiles cracking, coming loose or de-bonding from your floor in the weeks after.
Preparing a concrete floor for tiling
When it comes to tiling a new floor, the most common base you’ll likely be working with is concrete. Concrete is an ideal surface for tiles, thanks to its rigidity when dry and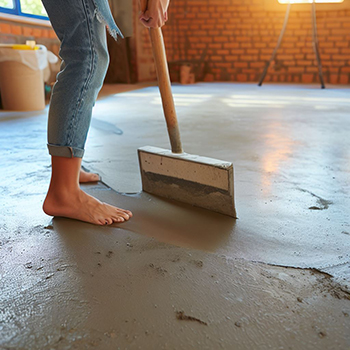 malleable surface when wet, but even concrete needs to be treated properly so that you get the best lay for your tile set.
First things first, if you’re working on a floor that was previously tiled, not only will you need to remove all the old tiling, but you’ll also want to chip off any adhesive still stuck to the floor. This is a simple enough process with the right tools; just be sure that you remove all previous adhesives before taking any other steps.
Once you’ve done this, you’ll then need to fill in any cracks you can see with an appropriate filler. Be sure to check that your chosen product is adhesive friendly and will work with concrete and make sure these cracks are fully filled and dried before you move on to tiling.
Finally, if you find that your floor is noticeably uneven, then you’ll need to apply what’s known as a flooring screed. This will help level your floor and give you a smooth tiling finish once fully dried. However, this drying time can vary depending on the time of screed used and its thickness, so be sure to check this before starting.
If you’re interested in learning more about this type of substrate, read our guide to tiling over concrete.
How to prepare a wooden floor for tiling
Although most tiling is done on concrete, there’s nothing stopping you from tiling onto a wooden floor if it’s been properly prepared beforehand.
Naturally, if you do plan on tiling over wood, then your first step will be to check that your chosen flooring is strong, stable, and free from rot. If any boards don’t meet these criteria, then they need to be replaced before you start.
While you’re examining your flooring, you also want to be sure to check it’s properly ventilated as well. Otherwise, your floor may trap too much moisture once tiled, allowing mould and rot to set in and weaken its structural integrity over time.
Once your floor’s strength and stability have been assessed, you’ll then need to remove any varnish or contaminants present on the boards, ensuring you’re adhesive can set properly. This adhesive will also need to be flexible enough to handle floor expansion, to prevent your tiles from cracking and shifting due to temperature changes.
Finally, go over your boards one more time and remove any nails or other pieces of metal that could get in the way of your adhesive, giving yourself a clean and level base to work with.
Tiling onto existing tiles
As a general rule of thumb, we don’t recommend tiling over existing tiles as this can present a variety of issues. Though, there are times when you might want to do this,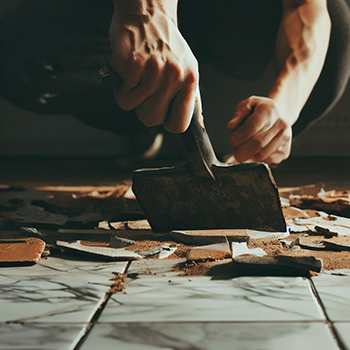 and it’s perfectly safe to do so. If you are considering retiling over your existing base, you can find out everything you need to know in our guide to tiling on top of tiles.
Tiling over underfloor heating
When laying any tiling, it’s essential that you know whether any underfloor heating is installed beneath your flooring. This is because the additional heat has the potential to significantly weaken your floor’s screed and adhesive.
So, if you are tiling over underfloor heating, be sure to select products that are flexible enough to resist or adapt to any sudden temperature fluctuations. For more information, explore our guides to tiling over electric underfloor heating and tiling over wet underfloor heating.
With this information in hand, you should now have everything you need to start preparing your floor for tiles. Of course, if you’re still picking what floor tiles you want to install in your home, then why not start browsing our full selection?
From sandstone and limestone tiles to indoor and outdoor porcelain options, we have plenty of options for you to choose from. Get in touch with our team of experts today to find out more and don’t forget to browse the rest of our tile installation advice for tips and tricks.


